Also this is the main documentation page for the firmware.
There are NUM_PWM_LVL=12 brightness levels, each makes LED power twice than the previous. Upon battery connection the level is reset to a not-bright default.
There's adjustable difference in brightness between Far-beam and Near-beam, (default: Far is 1 level brighter than Near). This difference can be adjusted by 1/4 (=1/NUM_INT_LVL) of a level. The dimmer lights' (Far or Near) brightness limits the minimal brightness of the brighter one during decrease - so that their relative brightness (the difference) stays the same. Same for maximum and increase. (so by default there are NUM_PWM_LVL-1 accessible brightness levels)
High-beam brightness is totally independent from Far and Near (no High/Far or High/Near "brightness differences").
Upon software on/off the level is kept (saved). As battery depletes, brightness of a level will start to decrease - help yourself by pressing R-button to increase it.
There are 4 (hard-coded) pre-defined sets of blinking parameters. Single blinks: L=long=1.5sec, S=short=0.05sec, M=medium=0.25sec, may be several in a row. F=flashy = like strobe = 7 very short (0.016 sec) pulses in quick succession (separated by 0.1 sec each). Each set may be combined with others, separated by a pause. This gives an assortment of blinkings for various needs. Blinks notation example: L+2M means 1 long blink, followed by 2 medium blinks. Last blinking set is also always followed by a pause - to distinguish different blinkings.
There's no general queue for info blinkings. If an info-blinking is about to start (due to a user command), while the previous did not yet finish (including the last pause!), this new blinking can either be canceled, or replace the previous. But this almost never happens anyway.
Upon battery connection info blinks battery voltage (unless locked).
R=right button, L=left (from context it's clear when L is button, and when a long info blink)
There are just two kinds of presses (here, in main commands): short, <0.65 s, and long - >. (for setup there are 5, see below) Long presses are denoted with dashes, like (--L--), short like (L).
Endianness notation: (L)(R) means: first Right button (press-release), then Left.
After short descriptions - confirmation info-blinks.
               Press         | Near+Far                      | High
--------------------------------------------------------------------
              (--R--)(--R--) = on/off, M after done             -
       (--R--)  (R)  (--R--) =   -                            on/off
                       (L)   = decrease brightness              -
                       (R)   = increase...                      -
         (L)    (L)    (L)   = fade off Far- and High-beam, M
         (R)    (R)    (R)   = restore back...
                 -   (--R--) = display voltage, nS            ditto
                 -   (--L--) = L                              ditto
         (L)    (R)  (--L--) = adjust Near-only brightness, M   -
         (R)    (L)  (--R--) = ...Far..., M                     -
         (L)    (L)  (--L--) = ...High..., M
          -   (--L--)(--L--) = Far-only mode, M                 -
  (R)    (R)  (--L--)(--L--) = reset mode and brightness,
                               turn on if off, M                -
  (5)    (5)  (--L--)(--R--) = key-lock, L+M                  ditto
  (0)    (0)  (--L--)(--R--) = enter learn mode, L+2M         ditto
  (0)    (6)  (--L--)(--R--) = enter setup, L+3M              ditto
When pressing several times, there's a timeout (same as boundary between short and long presses, ~0.65s) for the previous press. Each valid press renews the timeout. Timeout expires = all previous press(es) erased.
In three cases timeout expiration also means a command - as shown. (--L--) command doesn't have any action associated with it (used only to back light the speed indicator; if you press Left button during this backlight, it'll stay on - as long as you keep the button pressed).
Exit from the three adjustment modes (Near/Far/High) - after 4 sec of buttons inactivity, confirmation: M.
After a too-low-voltage, or too-high-temperature shutdown, the brightness difference may be out of sync. To reset it, there's the (R)(R)(--L--)(--L--) command. Another reason for this command.
Triple press on left button makes Far light idle (minimal brightness), essentially leaving Near (dimmed) as the only light. High-beam also goes to idle if it was on.
After the (--L--)(--R--) pre-press, flashy info signal is given - to confuse the user - to keep him away from entering rare modes (esp. setup). Also next 2 presses have to be much more accurate, see below.
Key-lock command locks buttons until a password is entered - see below.
Last three commands (key-lock,setup,learn) can only be entered when headlight is off.
Simultaneous (R+L) press turns (immediately) strobe mode on - on the Far light. Release one (any) button - it will stay steady on max brightness; press again - strobes, etc. Release both buttons - it will return to where it was (off, on, idle).
High-beam light strobes same, but needs pre-presses (to not acidentally turn it on, since it's blinding). Its strobe has two brightnesses, small, and max. (R)(L) (followed by simult. press) - makes strobe on small brightness, (L)(R) - on max. With these 2 pre-presses Far will not be strobing.
Near is never strobing.
                    | Left  Right
very short, <0.1 s  |   0     5
     short, <0.25 s |   1     6
    medium, <0.65 s |   2     7
     large, <1.6 s  |   3     8
very large, <4 s    |   4     9
In these terms, "short" presses in main commands above is shorter or equal than medium, and "long" is longer than medium.
To help to learn these, there's the learning mode. After entering digit n, info blinks with shorts: ((n mod 5)+1)S. This applies to both setup, and learn mode. Note the "+1", e.g. entered 2 (or 7) is confirmed with 3 blinks.
In learn mode, if user pressed "ideally - as should be pressed" - far from durations boundaries, main power LED also briefly blinks once (not bright).
Exit from both setup and learn - simultaneous press R+L, with F info-confirmation.
Endianness notation is same as before, e.g., 15 means: first press (very short) Right (5), then (short) Left (1)
  547 = set temperature threshold, L+M
  347 = remove temper. thr. (=set it high enough), L+2M
 0n27 = set n-th voltage threshold (n=0..NUM_THSH+2), L+(n+1)S
 pq05 = set the first-entering 2 password digits, F+L+(q+1)S+(p+1)M
 pq15 = set last 2, F+(q+1)S+(p+1)M
Timeout of a previous press is ~4s. Upon timeout expiration, info flashes (F) to indicate the clearance of all previous input. If accidentally entered a wrong digit, wait the timeout.
To set temperature threshold, heat up the MCU to temperature 10°C below the needed shutdown threshold, and enter the (appropriate) command.
To set voltage, externally set it up (via some resistor/whatever), and enter the command. If one (some) threshold is re-programmed, all thresholds below this one will shift accordingly - both bug and feature to keep in mind. Voltage for n-th threshold must be below that for (n+1)-th threshold. This might prevent setting a threshold - depending on the already-present configuration (so recommended to start from the highest and proceed to the lowest threshold). Voltage difference between thresholds must be neither too small, nor too big (implementational constraint: 2<=v_thsh[jj]<=255) - otherwise there'll be no confirmation.
Always watch the confirming info-blinks.
There are NUM_THSH+1 voltage bins - for displaying voltage. (NUM_THSH=[1..7] is compile-time const, not user changeable). Hysteresis is implemented to not trigger blinking if floating around some trip point. One more bin ((NUM_THSH+2)-th) is only used for hysteresis, it doesn't affect blinking directly. So user may define NUM_THSH+3 bin boundaries - trip points. Only one blinking per trip point crossing - when voltage drops as battery depletes. Below they are numbered from 0 (e.g. the last "hysteresis" bin is (NUM_THSH+1)-th).
ii_v = Voltage threshold and bin
for NUM_THSH=4
          2.7V                            4.2V  voltage
-----------|-------------------------------|-------->
           |                               |
   ii_v    [ 0 )[ 1  )[  2  )[   3   )[ 4 )[ 5 )6
-------|---|----|-----|------|--------|----|---|-----
 info  |F+L| F  | F+S | F+2S |  F+3S  |F+4S|  F+L+4S
Period of auto-scheduled voltage measurements is (about) 2 minutes. Temperature is also auto-scheduled with the same period, between voltage.
The indicated blinks are for auto-scheduled measurements. They are all prepended by flashy info signal to draw attention. If requested by the user, the pre-pending flashing is skipped (except for ii_v=0)
If voltage drops below 0-th threshold, we shutdown, confirmation: F+L. When it's above the (NUM_THSH+1)-th, a long is additionally used (too high voltage is bad for Li-Ion chemistry).
Be aware that voltage measurements are temperature dependent. In the cold, it'll measure higher.
3 bins, 5°C-wide each, 3d right below the shutdown threshold. As long as we stay in n-th bin, info blinks F+nM on auto-schedule (note: for voltage S, here M).
Temperature shutdown confirmation: F+4M.
Key (button) locking is indispensable for leaving the headlight on the bike while you are away - who needs a light that doesn't work? :) Similar to "security code" feature in cell phones, works as anti-hijacking.
Near and High lights require a password on power on (= on battery power *connection*). Far does not. This is hard-coded. (of course, software-on/off doesn't require password)
Password. Length=4 presses (hard-coded), 5 durations (as in setup), 2 buttons give (2*5)^4=10,000 combinations. Changeable from setup. Entered silently, without any info confirmation - as if the headlight is dead. If correct, there will be L confirmation. Default password: 0505, that is, very-short presses: right, then left, right, left.
(FYI - not user-configurable)
Every ~1/30th of a second LED power is multiplied by 2^(1/4), i.e., increased by 1/4 of a brightness level, during light-up (reminder: brightness levels are separated by multiplier 2), or divided - during light-down. When powering on from off, the very first brightness level sets immediately, next one takes ~4/30 sec, and so on, the last one takes ~4*(NUM_PWM_LVL-1)/30~1.4 sec.
One may wish near light to come on immediately after far-only mode - safety first. However, it looks so, so much better when smooth, and so bitterly rough when immediate - that I put safety aside, and beauty first :)
Let raw EEPROM data be: 010100FA2B2A662829B5282706. This is for brake light, NUM_THSH=6, so last 9 bytes define voltage thresholds. The 4th byte, 0xFA=250 is the temperature threshold (default - not yet set). Other bytes - see the source.
Temperature calibration example. The key fact that allows calibration and later re-set is that measurement is a linear function of temperature, i.e., the slope is (almost) const (and =1 from datasheet). I set temperature at 39°C - threshold becomes 49°C. Then I read EEPROM, the value was 0x9b. I want threshold to be 80°C. So I wrote the value 0x9b+(80-49)=0xba. The closer the setting temperature to the desired threshold - obviously, the better, but it should be OK if setting even at room temps.
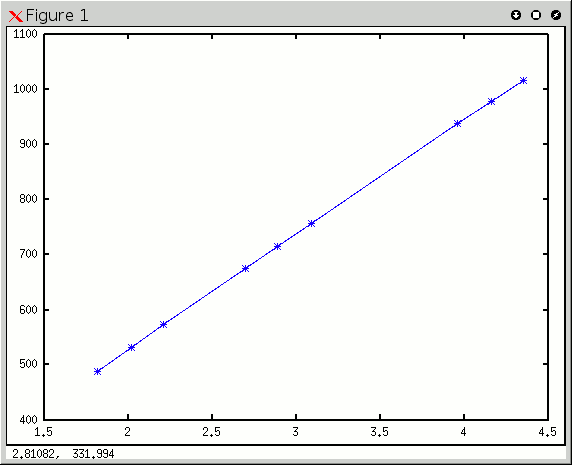
Voltage measurements are 10bit, so each threshold lies in [0..1023]. The EEPROM bytes however contain *differences* between thresholds (this explains the above thresholds shifts). The following illustrates (octave/matlab) meaning of the values: to get the actual threshold position, one should sum the differences.
vs=[4.35 4.16 3.96 3.09 2.89 2.70 2.21 2.02 1.82]; % Vcc by multimeter
d=[0x2B 0x2A 0x66 0x28 0x29 0xB5 0x28 0x27 0x06]; % the above, edited
d=d(end:-1:1); % reverse the order
ds=zeros(size(d)); for ii=1:size(d,2) ds(ii)=sum(d(1:ii)); end;
% ds : 6    45    85   266   307   347   449   491   534
plot(vs,1023-ds,'*-'); % straight line
Figure (btw, these EEPROM/Vcc values are real measurements, not fakes). After such calibrations, one can re-set the temper./voltage thresholds precisely where needed, and very easily - by simply re-programming EEPROM.
(only differences, all common comments not repeated)
(L)(L)(--R--)(--R--) = off tail light, M
(R)(L)    [same]     = on tail brightness=0, M
(L)(R)    [same]     = on tail brightness=1, M
(R)(R)    [same]     = on tail brightness=2, M
(0)(3)(--L--)(--R--) = enter brightness demo mode, L+4M
No blinking modes because I consider them evil. Commands for key-lock,learn,setup - same.
Left-button press - lights up the brake light, which is much brighter than (any of) the tail. Info LED lights up for confirmation, stays on until the button is released, or until info starts blinking voltage drop or temperature rise.
To make a brighter signal (for far-distance/snowy/foggy/etc signaling only), simultaneously press R+L, with a pre-press (such complications - to not accidentally turn it on - too bright). With (R) single-pre-press: signal is 4 times brighter in power. With (R) double-pre-press: signal is 4 more times brighter in power.
When braking, auto-scheduling (voltage and temperature) quicks up - compared with when tail is on. No auto-scheduling when off.
Using NUM_THSH=6.
Brightness demo mode. 1st part - tail brightnesses, 2nd - brake with tail-2 on.
 off,      tail-0,     off,      tail-1,      off,     tail-2,    off,
tail-2,   + brake-0,  tail-2,   + brake-1,   tail-2, + brake-2,  tail-2,
(then longer off, then repeat over again)